DIY OPA2134 RIAA Phono Preamplifier (MM / MC)
Bruce Heran  
|
Powered by  Übersetzer Übersetzer |
Op-amp Based Preamp for Moving Magnet (MM) and Low Output Moving Coil (LOMC) Phono Cartridges
This project is a departure from that of my normal sort. It is based around an operational amplifier (op-amp)... Yup I've transgressed to the dark side. Actually I have nothing against integrated circuits (IC) or solid state devices and in fact use a number of solid state components in my designs. This project is for a relatively simple high performance phono preamplifier that can handle both moving magnet (MM) and low output moving coil (LOMC) cartridges. The basis for the project was a temporary need to have a LOMC preamp in addition to the valve (vacuum tube) ones I have to study low noise performance. Without trying to start any arguments, I have found that it is a lot easier to make a low noise high gain solid state circuit than it is to do the same for valve circuit of similar capabilities. The circuit I came up with is pretty much like many common op-amp based phono preamplifier circuits. I did go through the process of doing the RIAA calculations and then some final tweaking with both my test equipment and use in my reference system. The values were initially fairly close, but tweaking made the performance significantly better. I used quality components throughout the build. I have always sought ways to do things better and easier so the power supply is a great example of this concept. I won't say I cheated, but I did use a solid state DC to DC converter to get the symmetrical voltages needed (available from Jameco for $10.95 each). For those of you unfamiliar with the Meanwell DCW03A-12 converter - (PDF 78kB) it is about the size of an ice cube and takes anything from about 9 volts to 18 volts DC as input and puts out symmetrical regulated dual supply at plus and negative 12 volts DC. This particular one is limited in current to about 125 mA on each rail. Other members of the family can deliver more and there are numerous voltage combinations available. Another one I like can take 120 or 240 volts AC input and deliver a regulated 12 volts DC at nearly half an amp. It is not much bigger in size. Line to load isolation is excellent. Since the output from the converter is regulated and symmetrical around "zero" volts there is no provision for restricting DC gain or offset. None was needed as constructed. Note however that DC offset adjustment might be necessary if you use a different method for the power supply.
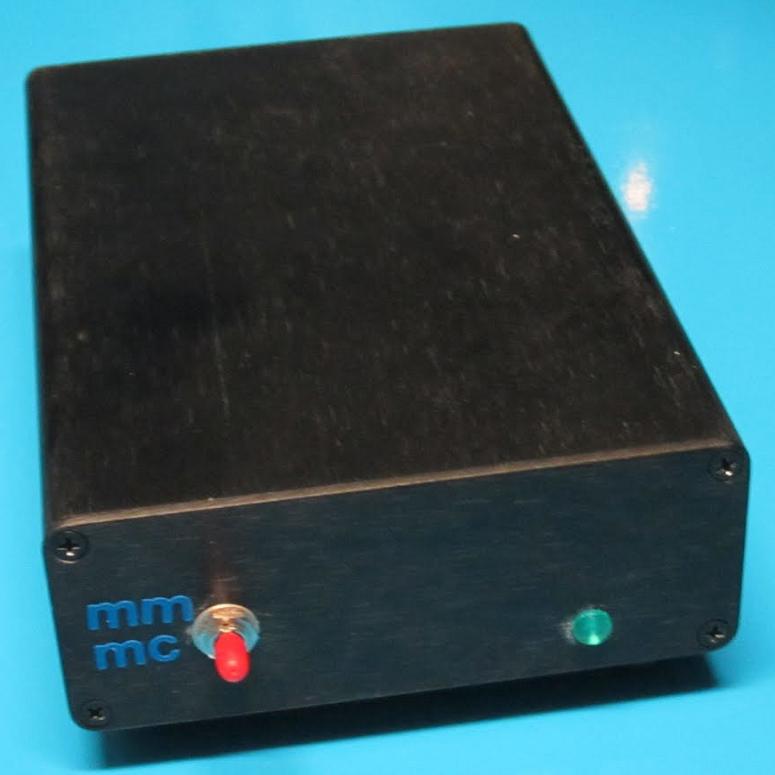
Photograph 1: RIAA Phono Preamp for MM and MC Cartridges - Front
Design Considerations - Op-amp based Phono Preamp
The circuit is a non-inverting IC based filter with significant gain. Four of the components in the feedback loop determine the proper RIAA compensation. Slight variation in any of them is unlikely to be audible. The remaining components determine the gain and are for stability. Using a 330 ohm resistor from the inverting input to ground will result in sufficient gain for MM cartridges (about 43 dB). Putting a 51 ohm in parallel with that resistor will increase the gain sufficiently to permit the use of LOMC (about 61 dB). Calculated values were different from these values and the gain was determined by measuring it. The values are approximate as the input signal levels are approaching the noise floor of my test gear. I used a 4 pole double throw mini-switch to change both the gain and input loading resistors to match my cartridges. Compliance with the RIAA curve was excellent. When I measured it, I was limited to the tolerance of the components (hand selected to be under 1%) in my reverse RIAA filter. The values on a Bode plot (done with a PC based DSO) of the response were within 0.2 dBV from 20 Hz to past 30 kHz (yes I know the RIAA standard doesn't go that high, but I can test for that response). Signal to noise was better than -90 dBV for either type of gain at any frequency. Throughout the majority of the audio band it was very close to -100 dBV. The input loading resistors should be changed to match your needs. I suggest using dip switches and having several values available. This is particularly the case for LOMC cartridges. Suggested values would be from about 40 to 500 ohms. Since the resistors are shorted to ground it is possible to get several combinations in parallel as well as individual values. For MM cartridges the normal value is 47 k-ohms. This can vary with some cartridges and you should use whatever value works best for your cartridge. No input capacitance was used, but it is sometimes needed with MM cartridges. Values in the range of 100 to 220 pF are typical. The need for them depends on the cartridge and the cabling between it and the preamp. Often the cable will have sufficient capacitance to negate the need for additional capacitance at the preamp input. I didn't measure distortion as the results were likely to be inconsistent because of the measuring method needed. However since this is a high gain feedback controlled IC amplifier I would expect the distortion values to be very low.
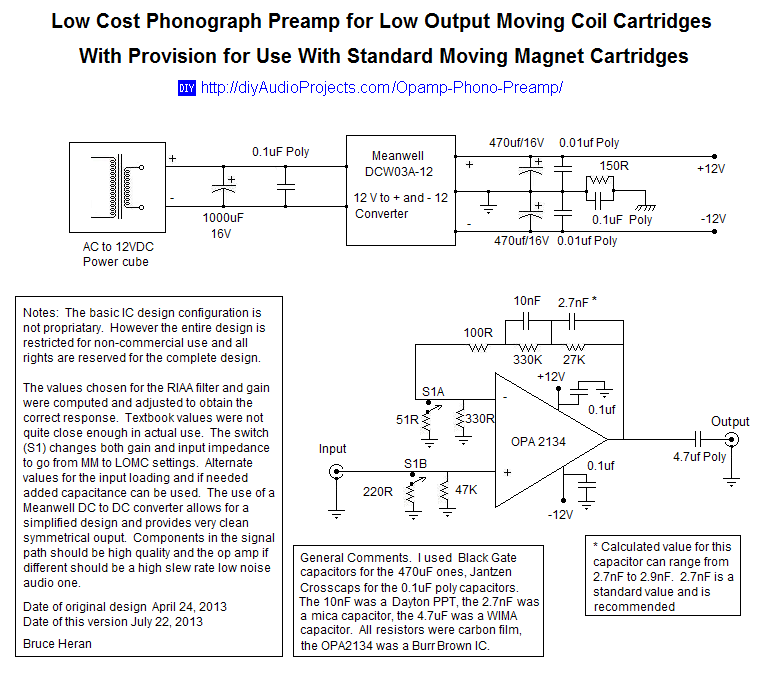
Figure 1: Op-amp based Moving Magnet (MM) and Moving Coil (MC) Phono Preamp Schematic
Building - Op-amp based Phono Preamp
Actual construction is not difficult. There are some things that do however matter. Grounding is always important in high gain circuits. I use a modified "star" grounding system. The power supply and active circuitry each have their own star the center point of which are connected to a "buss" ground wire that runs between the input and output jacks. I use silver wire for the buss as it has very low resistance. It is also important to keep the ground connections as short as is reasonable. The power supply components should be physically kept away from the inputs and main circuit if possible. Even though the converter operates outside the audio band, it is possible to have it interfere with the active circuitry. About 2 inches of separation is sufficient. The final 0.1 uF capacitors should be physically located as close to the op-amp as possible. I used common perforated protoboards to hold the components. Pretty much any form of construction is going to be OK. I use sockets to hold the op-amp. It makes it a lot easier to replace an op-amp if something goes wrong and you cook it. It is also easy to try different op-amps. BTW there are many op-amps that share the same pin connections and can be substituted for the Burr Brown OPA2134 used in this project. It is a dual channel operational amplifier, but there is no reason that single channel op-amps could not be used. The only restrictions would be that they be low noise, low distortion and high gain-bandwidth product ones. Most recent audio grade op-amps meet those requirements easily.
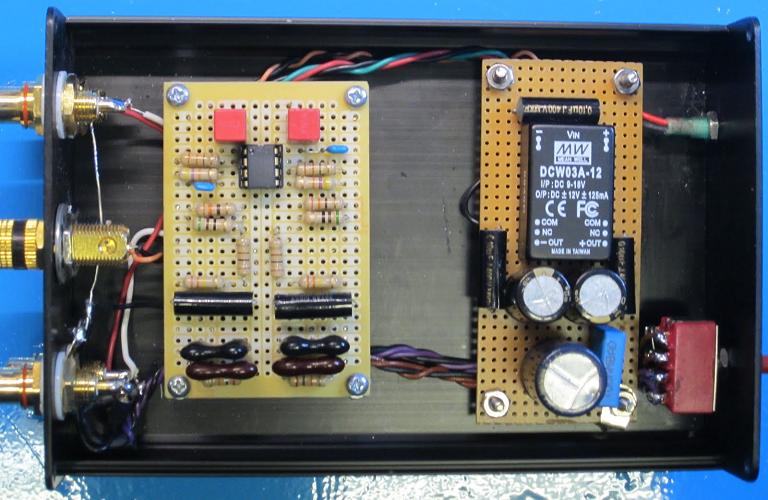
Photograph 2: Inside the Phono Preamplifier - Note: ground buss wire does not touch the ground terminal
Other Considerations
The circuit can be powered by nearly any wall wart if you use the specified DC to DC converter. Cleaner DC is preferred but doesn't seem to be all that necessary. You can of course use a pair of 9 volt batteries to power the RIAA preamp as well. Alternative more conventional power supplies can also be used, but the signal to noise will depend on how quiet they are. Bear in mind the earlier comment regarding DC offset and different power configurations. A fully shielded metal enclosure is essential. The preamplifier will pick up noise and hum quite easily if it is not well shielded. Do not ground the input or output jacks to the case. The 150 ohm and 0.1 uF type X2 capacitor are the only things that should be connected to the case. A ground terminal is affixed to the case for connection to the turntable ground. Any other connections can result in a ground loop and seriously degrade the signal to noise performance.
Listening
This is where things always get fuzzy. What I hear and what my system does is quite unlikely to be the same as your results. That said though, this is a surprisingly nice sounding preamplifier. My reference system consists of a digital remote control preamplifier that I designed. It was used in the passive mode. It uses a relay switched digital array of precision metal film resistors to adjust the output. It feeds my reference pair of KT88 Oddblocks (numerous upgrades like Russian Teflon capacitors). The speakers are Martin Logan Vista ESLs that are augmented in the sub 40 Hz range by a pair of Martin Logan powered subwoofers. I used an AT33PTG/II cartridge for the LOMC in an Origin Live tonearm on my custom turntable (made from a Dual 701 direct drive). I used a Grado Reference Platinum I in another Origin Live tonearm on a Sota Moonbeam for the MM testing. The AT cartridge is an exceptional performer. Anyone needing a LOMC should seriously consider it. Unfortunately at approximately $500US, it is not cheap and is available only directly from Asian sources. The sound through the preamplifier was clean, detailed and had a wide sound stage. It was at least as quiet as my reference valve preamplifiers that use step-up transformers. The bass response was solid with a clean mid range and top end. I have heard fairly costly solid state preamplifiers that were not nearly as satisfying. It was quite listenable and had rather nice presentation. With the Grado, the response was typical of the cartridge. It had really solid bass, very warm midrange and clean highs. The Grado and preamplifier would be a terrific rock combination if the rest of the system can keep up with them. I briefly tried an Ortofon OM-30 and it sounded just fine as well.
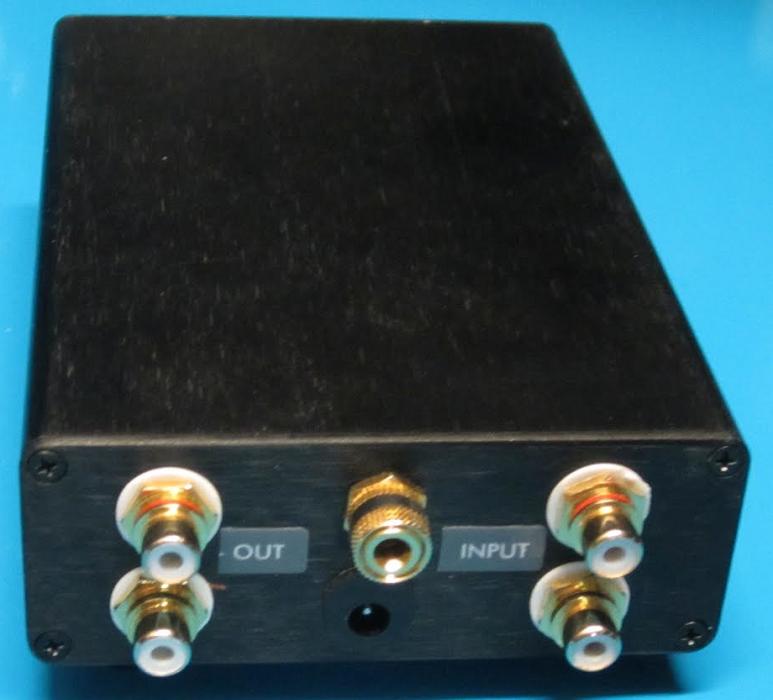
Photograph 3: RIAA Phono Preamp for MM and MC Cartridges - Rear
Final Thoughts
This is an easy to build project that will not cost a fortune. The ratio of "bang for the buck" for this phono preamp is quite high. I estimate a frugal DIYer could duplicate this RIAA preamplifier for about $100US. The biggest cost variation will be the enclosure. The enclosure I used was $17. I used quality components and they can add to the cost, but really premium parts don't seem to be justified. BTW, I have no intention to give up my RIAA valve phono preamp for an op-amp based one. The quality of presentation provided by the valve preamplifiers is significantly different from the op-amp based preamps I have heard and at least to me, much more to my liking.
Good Listening
Bruce
Please feel free to comment or to ask any questions that you may have about this phono preamplifier project in the forum thread:Inexpensive IC based phono preamp for LOMC.
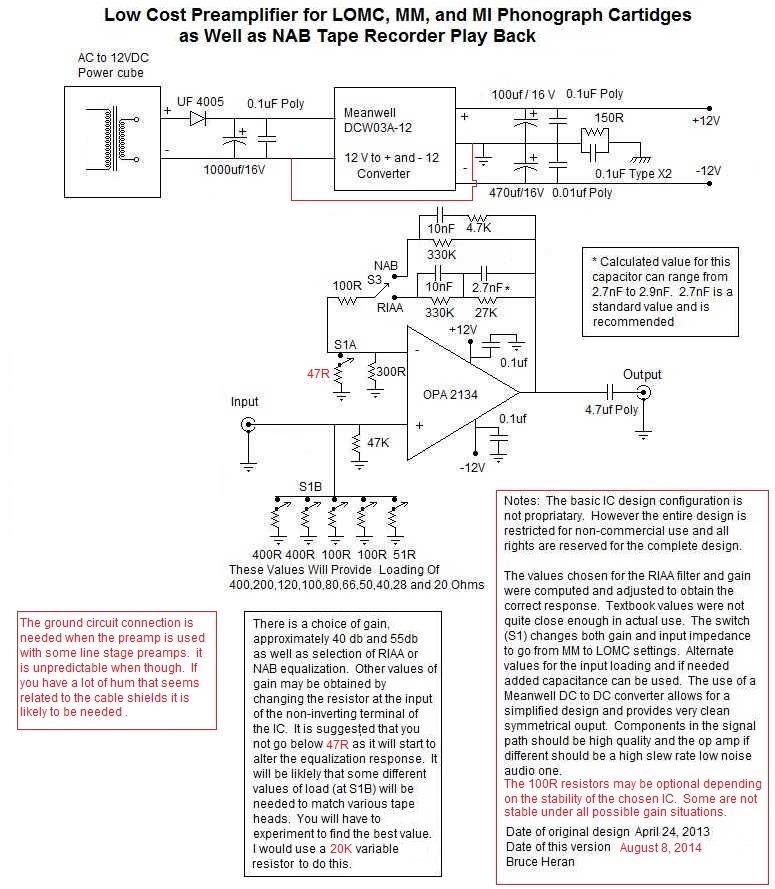
UPDATE - 8 August 2014
There is an update to the phono/tape gain stage. I found a compatibility
issue with some line stage preamplifiers that is apparently related to
the way they handle signal and shield grounds. The result is a
significant amount of hum that seems to be related to the shielding of
the input and output cables. (it isn't though) To resolve the issue a
connection is needed between the negative DC input from the wall wart to
the common (aka power ground) on the signal side of the DC to DC
converter. This may also apply to other methods chosen to power the
preamp. I also made a few updates on the schematic and some new
notations on some components that folks had questions on.
